Design Breakdown: The Black Bathroom
This bathroom, affectionately called “the black bathroom” in our office, is from an early Runcible project, and remains one of our most talked about spaces! Let’s break down five of the key elements that make up this space [sources and specs listed at the end].

1. Black penny tile
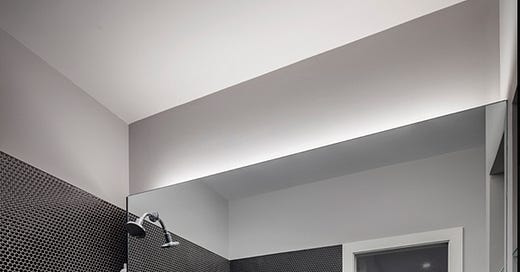
We used the same black penny tile on the walls and floor, with one subtle difference - the floor tile is matte, and the wall tile is gloss. This subtle difference can’t be seen in the photo, but makes a big impact in person. Don’t forget to consider the type of finish of your materials - paint sheen, tile or stone gloss level, etc will all impact the space - make sure you’re doing it on purpose!
Also, a practical reason for the switch: matte tile is much less slippery, so it’s much safer to use on floors than gloss tile.
Don’t forget the grout - the wrong grout color can be a disaster! The best thing to do is get a physical grout chart or kit, and make sure - this is important - to look at the tile and grout selection in the same type of light you’ll be using in the space. People often choose grout under the bright lights of the showroom, or in the dark/high contrast light of the construction site, and then wonder why it doesn’t look right under the final lighting!
2. Wall hung toilet
We usually use Toto or Geberit wall hung toilet and tanks [though of course there are other great brands as well], and one of the main benefits is that they take up a lot less space than traditional-style toilets. The tank is contained in the wall [note the chrome flusher buttons above the toilet bowl, and in this project, we padded out this whole wall to fit the plumbing neatly behind - not just for the toilet, but for the sink and shower as well. One thing to keep in mind with a wall-hung toilet is that you usually need a 2x6 wall for the tank to sit inside - they can work in a 2x4 wall, but the tank gets quite tall!
3. No shower glass
Did you notice that there’s no shower glass or shower curtain? This is a ”wet bathroom,” meaning that the whole space is able to get wet from the shower spray. This is fun to do when trying to keep the aesthetic very minimal, in a bathroom that’s not a main bathroom that gets a ton of use [certainly not a kid bathroom…!], or where you want to make a bold statement…and where you’re not worried about privacy! Two other things to note about the shower: check out the floor-to-ceiling niche in the corner, where toiletries can be stowed away, and how about that slick linear drain [instead of a traditional center drain]? Little details that go a long way.
Don’t forget to protect the toilet paper…note the hinged chrome cover…no one likes wet TP!
[Also, check out my Twitter thread on shower glass, if you missed it!]
4. Continuous mirror
A large continuous mirror is a great way to open up a space, and to brighten dark rooms [this bathroom is in a basement!] Run it wall to wall, with no frame, and flush with the tile for a very sleek look. This isn’t really expensive to do - you can get a custom cut mirror from a custom glass shop - they come out and template your space, and cut a mirror to fit *perfectly* wherever you need it. Note how we held the wall behind the mirror down below the top of the mirror so we could install an LED uplight - another very cost effective way to create a seriously custom moment.
5. Lines, lines, lines
Something that separates really good design from average [or bad] design is knowing how to line things up. Notice how we aligned the top of the tile with the top of the doors and the mirror, and even made sure that when we took the photo, we lined up the reflection perfectly. Even though everyone may not notice these details exactly, they come away with a sense of a highly tailored, tight, well-detailed space.
Bonus: Supplier round up
tile: Ann Sacks
toilet: Duravit
sink: Duravit
faucet and shower fixtures: Grohe
mirror: custom
paint: Sherwin Williams “Mindful Gray”
linear drain: Schluter


